IDA websites look best when the following guidelines are followed.
Note that this checklist does not include all steps required to set up a client account. This checklist focuses on how to make an IDA website look visually appealing. These simple steps can dramatically improve a website’s conversion and SEO ranking.
Photos and Images
Note that images can be uploaded to the Control Panel in .jpg, .png or .gif formats. The JPEG format is the most standard for photos.
You must be able to crop and resize images. Many programs can do this. Your computer probably already has an image editing program installed. You do not need access to any advanced image editing tools. However, the ability to crop and resize images is essential to making websites look good.
For websites to look their best, images must be uploaded as specific sizes. You can see a list of all Control Panel Image Specifications in Appendix 2.
Promotional Photo
| Meet the Doctor / Promotional Photo
120p wide x 150p tall |
Most important is to add a promotional photo of the doctor or doctors. This photo appears on the home page of the website, and it personalizes the site and increases patient conversion.
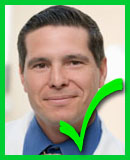
The photo should be of the primary dentist, or of the partners standing together. The picture should be cropped closely enough that you can clearly see the doctors’ faces.
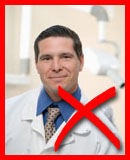
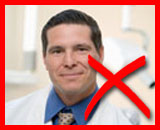
The photo MUST be vertical (portrait orientation), not horizontal (landscape orientation). It should be 120 pixels wide and 150 pixels tall.
Examples of good and bad promotional photos
 |
 |
 |
||
| Doctor photos must be 120 pixels wide by 150 pixels tall, in portrait (vertical) format. | Photo should be cropped closer so doctor’s face is clearly visible. | Doctor photo must be vertical (portrait orientation), not horizontal. | ||
 |
 |
 |
||
| Multiple doctors can be included in the promotional photo. | Photo must be vertical, not horizontal. | Do not try to include too many doctors in the promotional photo. | ||
 Control Panel > Customize Portals > Logo & Promo Photos
NOT Control Panel > Practice Locations > Logo & Promo Photos
Practice Logo
| Practice Logo
200p wide x 100p tall |
If the practice has a logo, you can upload it, and it will appear on the top corner of all website pages.
The logo must be horizontal (landscape orientation). It should be 200 pixels wide and only 100 pixels tall.
If the logo needs clear space around it, you can upload the practice logo in .png or .gif image formats. (PNG and GIF images allow clear space, which JPEGs do not.) If the logo is not wider than it is tall, you should make it 100 pixels tall, then center it within 200 pixels of clear space, and save it as a .png or .gif image. That way, the logo will appear to float within the space available to it.
Examples of good and bad logo files
|
|
|
|
||
| Logo files must be 200 pixels wide by 100 pixels tall. Any background should be clear, which means file must be saved as .png or .gif | If there is blank space, it must be clear, not white. Images with blank space cannot be saved as .jpg files. | Logo files must be horizontal (200 pixels wide by 100 pixels tall). |
Control Panel > Customize Portals > Logo & Promo Photos
NOT Control Panel > Practice Locations > Logo & Promo Photos
Office Photo
| Office Photo
400 pixels wide x about 300 pixels tall |
It is also valuable to add a photo of the dental practice itself. This photo appears on the “Map & Hours” page.
The image should be welcoming. It will most often be of the office building’s exterior. However, the office photo could also be, for example, a distance view of the shopping plaza where the office is located, or an image of the waiting room and reception desk.
If the doctor does not provide an image, it may be possible to go to Google Street View and get an external view of the office location. However, it is better to include no image at all than to include an image that does not look good.
The photo will look best if it is horizontal (landscape orientation). It should be 400 pixels wide. Height does not need to be exact, but it will look best if it is between 200-400 pixels tall.
Control Panel > Customize Portals > Office Photo & Hours
NOT Control Panel > Practice Locations > Office Photo & Hours
Video Content
Videos make the website itself more interesting and interactive. The presence of video content improves search engine ranking. Video thumbnails appear in search engine results, which increases traffic.
Selecting the Right Videos
Choose videos based first on the website’s primary focus area. It is also fine to add videos about general dentistry or other services the practice offers. Do NOT add any videos for services the practice does not offer.
If the client is subscribed to IDA’s Premium Video Library (with video content provided by Lumivid), be sure to include videos from the premium library.
Check the first appendix of this document for a list of all focus areas and associated videos.
Adding the Videos to the Website
It is best to add videos in many of the available places for inserting video. However, do not add videos in all slots. There should only be one video on any given page. Multiple videos on a single page confuses the viewer and does not improve SEO.
- Home Page
Add one video about the primary focus area to the home page. Where you can insert videos on the homepage depends on the website’s design template.- T01: “Left Column” video is listed first, and displays a large video. “Right Column” video is listed second, and displays a smaller video.
- T02: “Left Column” video is listed first, and displays a very large video that replaces the central images. “Right Column” video is listed second, and displays a smaller video.
- T03: “Left Column” video is listed first, and displays a large video. “Right Column” video is listed second, and displays a smaller video.
- T04: “Right Column” video is listed first, and displays a large video. “Left Column” video is listed second, and displays a smaller video.
- T05: Videos can only be inserted on the home page in “Rotating Promo Alternative,” which replaces the rotating promotions.
- Meet The Doctor Page
Optionally add a video to “Right Column.” - What We Offer Page
Add a video about the primary focus area (or general dentistry) to either “Center” or “Right Column.” - Appointments Page
Add a video about the primary focus area or general dentistry to “Right Column.” - Dental Info Center Page
Optionally add a video to “Right Column.” - Articles Page
Optionally add a video to “Right Column.” - Dental Market Main Page (Specific Dental Markets)
For each dental market, add a market-focused or general dentistry video to either “Center” or “Right Column.”
Control Panel > Customize Portals > Insert Videos
Video Gallery
You can also add video content to the website on the Video Gallery page. This is nice, but not nearly as important as adding video content to specific pages.
Control Panel > Customize Portals > Video Gallery
More Website Features
Rotating Promotions
Make sure that each website has rotating promotions. All new sites will automatically include rotating promotions that are visually attractive, generic in terms of offers, and related to the site’s focus area. However, this may not be the case with sites that are older or that have had their primary focus area changed.
Look at the website’s home page and check that the rotating promotions are relevant. If there are any problems, select new promotions from the list of “Suggestions” within the Control Panel.
Control Panel > Customize Portals > Promotions
Home Page Features
A website’s home page will look richer and more appealing with the inclusion of some Home Page Features.
You should look at the website’s home page to decide how many Home Page Features will look best. It will depend on the template design of the website and what other information is included on the website’s home page. Some pages will look most balanced with just 1-2 Home Page Features, while other pages will look best with 6 or more. Ideally, when you scroll to the bottom of the home page, the ends of the columns will roughly line up with each other.
Choose Home Page Features from the list of suggestions within the Control Panel. You can choose products that the practice offers (like Invisalign), types of dentistry offered (like Dental Implants), financial options (like Dental Insurance or CareCredit), or link to page within the website (like Map & Hours).
Control Panel > Customize Portals > Home Page Features
Website Design
Templates & Portal Design
Make sure that the template design and color scheme of the website is appropriate for the dentist, practice and focus area.
For example, a black website may not be appropriate for children’s dentistry, and a light pink website may not be appropriate for dentures.
The best template may also depend on what additional information the doctor has provided. For example, a doctor with lots of testimonials may do best with a T04 template, where patient testimonials are displayed on the home page.
See Appendix 3 for images of and details about IDA’s design templates.
Control Panel > Customize Portals > Portal Design > Choose a Skin
Practice Name, Certification & Rotating Slogans
It is the practice name as entered here that will appear on the website itself, at the top of every page. Make sure the practice name appears correctly.
It is generally appropriate to add some sort of “Certification” text: for example, “General Dentistry” or “Board-Certified Orthodontist.” This text can describe either the type of dentist or the type of dentistry offered. This text is sometimes legally important, as it ensures our dentists are accurately representing themselves online.
Some designs (T01, T02 and T03) feature rotating slogans. Rotating slogans are now generated randomly from a pool of focus-area specific choices. If a site is older, or if the site’s primary focus area has been changed, these slogans may need to be updated. Click the “Reset” button to generate a new random set of appropriate slogans.
Review the slogans on the website’s home page to make sure they look right. For example, a slogan that is too long may overlap the picture on the website header. In that case, just select a shorter slogan from the drop-down list of default options.
Finally, make sure that the color of the slogans is appropriate for the background image. If needed, change the slogan text color in the Options tab.
Control Panel > Customize Portals > Portal Design > Options
Customize Images
To make each site look unique, you can also change the main website images from their defaults. (Note: These images cannot be changed in the T04 template. However, there are three different T04 designs, and each one has different images. Be sure to use all three variations of T04 – blue, green and black – to maximize variation.)
When you click the “Customize Images” tab, the homepage masthead image will be listed first. Click the pencil icon next to that image, and choose a new image from our stock photos. Make sure the image is appropriate for the focus area. For T01, change the subpage masthead image so it corresponds to the homepage masthead image.
Review the image on the live website to make sure it looks appropriate and the colors harmonize.
Control Panel > Customize Portals > Portal Design > Customize Images
Doctor Profiles
Doctor Photo
| Meet the Doctor Photo
120p wide x 150p tall |
After the doctor’s name, their photo is the next most important part. This will appear on the “Meet the Doctor(s)” page.
Each doctor photo should be of that individual dentist. The photo MUST be vertical (portrait orientation), not horizontal (landscape orientation). The picture should be cropped closely enough that you can clearly see the doctor’s face.
If you do not have a photo of the doctor, it is acceptable to add a generic image.
Examples of correct and incorrect doctor photos
|
|
|
||
| Doctor photos must be 120 pixels wide by 150 pixels tall, in portrait (vertical) format. | Photo should be cropped closer so doctor’s face is clearly visible. | Doctor photo must be vertical (portrait orientation), not horizontal. | ||
 |
 |
|||
| If no photo of the actual doctor is available, include a generic image in place of the doctor photo. | Do not leave doctor photo blank. | |||
Only include a Doctor Video if you have a welcome video recorded by that actual doctor. Do not use generic or library videos for the Doctor Video.
Control Panel > Doctors > Dr. XYZ > Doctor Info
Doctor Logos, Credentials and Memberships
If possible, include any credentials or memberships the doctor may have. This could include national, local or specialist dental associations or societies; the school from which the doctor graduated; board certification status; or memberships in other community-focused organizations.
Note that Internet Dental Alliance membership is one option. However, only select this if you have at least one other credential or membership to list.
If any credentials and memberships have logos associated with them, you should also add those logos to the doctor’s profile.
In some cases, you may be able to find information on a doctor’s memberships with a quick web search. Try searching Google for the doctor’s name and keywords like “association,” “society” or “member.”
Control Panel > Doctors > Dr. XYZ > Logos
Control Panel > Doctors > Dr. XYZ > Credentials and Memberships
Doctor Philosophy
Select a generic philosophy statement for the doctor.
Control Panel > Doctors > Dr. XYZ > Philosophy
Additional Practice Information
It is now required that all websites include secondary dental markets and additional cities. This information is essential to good search engine positioning. Moreover, website templates are designed to accommodate this information. Without this information, websites may have unexpectedly empty spots and will not look as good.
Secondary Dental Markets
Make sure the website includes THREE secondary dental markets.
If this information is not provided, you should be able to find it either by looking at the client’s practice services analysis, or by seeing what other focus areas that client has websites for.
Control Panel > Customize Portals > Dental Markets
Geographic Markets
Make sure the website includes FIVE geographic markets. Some doctors are reluctant to add additional geographic areas, but this hurts their search engine placement.
The first should be the city or town where the practice is located. The next four geographic markets will typically be neighboring towns. However, this is not always the case. For example, you could include neighborhood names (especially in urban areas), nearby landmarks or regional identifiers.
If the client has not provided five geographic markets, you should complete the list. If you have no additional information, find the practice in Google Maps. Zoom in close. As you slowly zoom out, make note of nearby neighborhood names, landmarks or towns.
Control Panel > Customize Portals > Geographic Markets
Final Review
The final step in always to review the website itself. Does the home page look good? Are there any obvious problems? Does it look professional, appealing and welcoming? Do the images, videos, and URL all match the focus area? If so, then you’ve done your job!
Appendix 1: Selecting the Right Videos
This table shows which IDA library videos are appropriate for each focus area.
| Focus Area | Focus Area Videos |
| General | Choosing the Right {DentistType} in {ServiceArea#1} {ST} Oral Health Is Part of Whole-Body Health: Your {ServiceArea#1} {DentistType} Your {ServiceArea#1} {DentistType} Can Do So Much Sports Safety: Dental Mouth Guards in {ServiceArea#1} {ST} [PREMIUM] Preventing Tooth Decay with {ServiceArea#1} {DentistryType} [PREMIUM] Why {ServiceArea#1} Dentistry Is So Important |
| Braces | {ServiceArea#1} Braces for Adults to Straighten Teeth Occlusion Is the Enemy of Straight Teeth: Braces in {ServiceArea#1}, {ST} {ServiceArea#1} Braces, Retainers & Orthodontics |
| Children’s | [PREMIUM] {ServiceArea#1} Children’s Dentistry [PREMIUM] Healthy Teeth for Children: Children’s Dentistry in {ServiceArea#1} {ST} |
| Cosmetic | {ServiceArea#1} Cosmetic Dentistry: The Dental Makeover {ServiceArea#1} Dental Veneers for a Brand New Smile Straighter Teeth, Invisibly: {ServiceArea#1} Cosmetic Dentistry Wedding Day Perfect Smile: {Service Area#1} Cosmetic Dentistry [PREMIUM] Dental Veneers in {ServiceArea#1} {ST}: Learn More |
| Dentures | {ServiceArea#1} Dentures & Mini Dental Implants {ServiceArea#1} Replacement Dentures {ServiceArea#1} Denture Options |
| Gum Disease | {ServiceArea#1} Gum Disease Treatment for a Healthy Mouth [PREMIUM] Preventing Gum Disease in {ServiceArea#1} {ST} |
| Implants | {ServiceArea#1} Dental Implants & Alternatives for Missing Teeth {ServiceArea#1} Tooth Implant Technology {ServiceArea#1} Dental Implants vs. Dentures [PREMIUM] About Dental Implants in {ServiceArea#1} {ST} |
| Implant Crowns | {ServiceArea#1} Dental Implants & Dental Crowns |
| Invisalign | {ServiceArea#1} Invisalign: How It Works {ServiceArea#1} Invisalign & Cosmetic Dentistry {ServiceArea#1} {ST} Invisalign: Orthodontics for Adults [PREMIUM] About Invisalign in {ServiceArea#1} {ST} |
| Root Canal | [PREMIUM] {ServiceArea#1} Root Canal Therapy for Tooth Pain |
| Sedation | {ServiceArea#1} Sedation Dentistry Options {ServiceArea#1} {ST} Oral Conscious Sedation Dentistry Dental Anxiety in {ServiceArea#1} {ST}: Unnecessary Suffering [PREMIUM] About Sedation Dentistry in {ServiceArea#1} {ST} |
| Tooth Whitening | {ServiceArea#1} Tooth Whitening for a Brighter Smile [PREMIUM] {ServiceArea#1} Teeth Whitening for a Brighter Smile [PREMIUM] About Zoom Tooth Whitening in {ServiceArea#1} {ST} |
| TMJ | TMJ Treatment: Relieve Jaw Pain in {ServiceArea#1} [PREMIUM] About NTI-tss Plus: Getting NTI in {ServiceArea#1} {ST} |
| Wisdom Teeth | {ServiceArea#1} Wisdom Teeth: A Crowded Mouth The Problem with Impacted Wisdom Teeth in {ServiceArea#1} {ST} {ServiceArea#1} Wisdom Tooth Removal & Sedation Dentistry |
We also have five generic videos meant for specific website pages.
| Website Tour Videos | Welcome to Our Website: {ServiceArea#1} {DentistryType} Meet Our Doctors: {DentistryType} in {ServiceArea#1} {State} What We Offer: {ServiceArea#1} {DentistryType} Financial Arrangements for {ServiceArea#1} Dentistry Dental Articles & Info Center for Dentistry in {ServiceArea#1} {ST} |
Note: This list includes all videos in the IDA Basic and Premium Video Libraries as of July 1, 2013.
Appendix 2: Control Panel Image Specifications
Most Important Images
- Meet the Dr. Photo: 120×150
- Promotional Photo: 120×150
- Practice Logo: 200×100
- Office Photo: 400 pixels wide
Portal Design: Customize Images
- Home Page Masthead: 975×200
- Subpage Masthead: 975×100
- Home Page Random: 471x200S
- Subpage Random: 200×150
- Focus Link Buttons: 133×60
- Focus Area Main Photo: 200×150
- Focus Intro Photo: 200×150
- Focus Subtopic Photo: 200×150
- What we Offer Page Photo: 200×150
- Financial Page Photo: 150x any height
- Form Page Photo: 200×150
- Top 10 Things Button: 300×70
- Top 10 things Photo: 150×100
Various Additional Images
- Home Page Feature: 125 pixels wide
- Promotions: 300×250
- Office Tour: 400 pixels wide
- Smile Gallery: 210×105
- Meet Our Team: 400 pixels wide
- Family Album: 450 pixels wide
Appendix 3: Portal Templates & Designs
Click any image to enlarge.
| T01 | 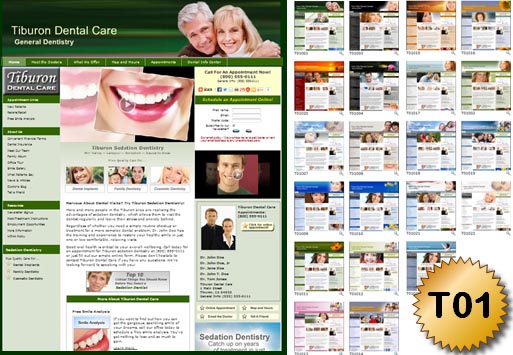 |
T01
|
| T02 |  |
T02
|
| T03 |  |
T03
|
| T04 | 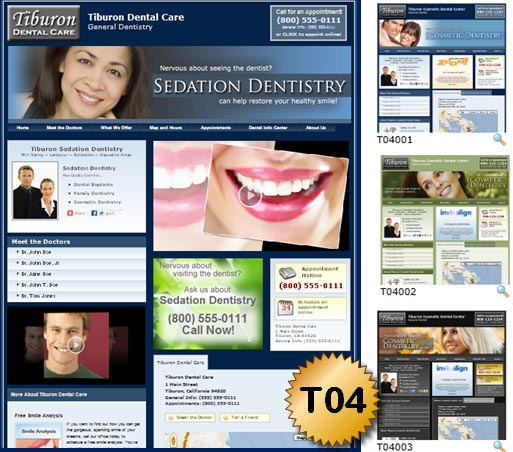 |
T04
|
| T05 |  |
T05
|